How Do I Change My Pictures on Facebook to Upload in Low Resolution Mode
Facebook is a great tool for sharing your images online with friends and family. Many of us do this on a regular ground, but photographers volition ofttimes find their images heavily compressed. You've probably uploaded a photo that looked fine on your computer, merely once on Facebook it looked soft and not as skillful!
This guide will give you all the acme tips for uploading images to Facebook and retaining as much quality as possible. I will cover optimum sizes, file types and other tips for getting the well-nigh out of your image.
Want to amend your social media presence? Try The Lensman's Guide to Social Media Marketing
Why does Facebook make images lose quality?
To assist fast webpage loading times for its users, Facebook compresses all images uploaded to it. As this is done automatically, your images are subjected to a default pinch, which more than probable does not suit them.
Facebook supports photos that are either 720px, 960px, or 2048px on their longest edge. Whatever other sizes will have their dimensions reduced automatically, and this inevitably results in visually poorer images. Reducing the dimensions of an prototype decreases its sharpness, especially if information technology is a drastic resize.
Reducing Pinch in JPEG Files
Facebook volition ever compress your images, there'southward no getting around that. Even so, there are some tricks to reducing the amount of compression that occurs.
The most important factor is the dimensions of your image.Make certain y'all upload your photograph at exactly 2048px on its longest border. Facebook won't change the dimensions of your image, so at that place is a lot less file compression required and your photo remains sharp. If you aren't comfortable uploading such a large file, so ensure that you upload a 960px longest edge photograph instead.
In one case you've resized the prototype, wait to encounter if information technology appears sharp enough. Make sure you are viewing the image at 100% size in your editing software. If information technology looks soft having been resized, sharpen it a lilliputian.
Then, utilize Adobe Photoshop's "Save for Spider web" function. Ensure that the image is selected to compress to a JPEG file at 70% quality, whilst also converting information technology to ansRGB colour contour. More than detail about using this function tin be found in our article "Preparing a Photo for Web Use".

Does It Really Piece of work?
Aye information technology does, and I was surprised at the degree to which information technology improves epitome quality. Hither is a comparison of a photograph uploaded at two different gear up of settings.
I've cropped in on the puffin that is part of a larger photo so that you can see the details. The sample on the left was uploaded at an obscure size of 1096px longest edge using a colour profile of Adobe RGB (1998). Yous tin can run across that the colours are lost slightly, especially effectually the eye. The image loses sharpness drastically, too.
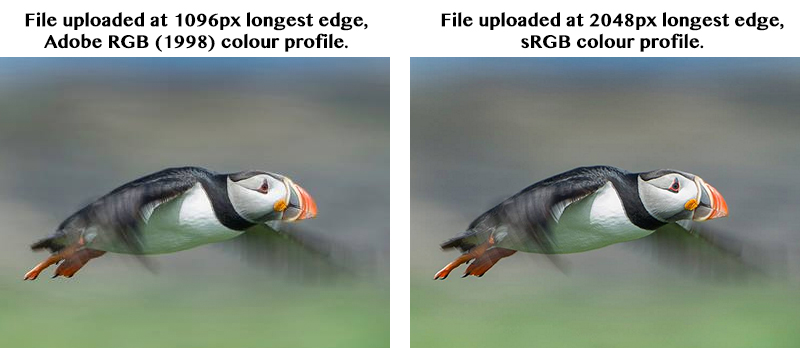
The paradigm on the right, even so, was uploaded at 2048px longest side with an sRGB color profile. I besides used the save for spider web function, equally mentioned above, saving at 70% JPEG quality.
As yous can run across, the prototype looks a lot amend for it. The colours are stronger, and reflect those of the original file. You tin run across red details effectually the eye and beak more clearly. The clarity and sharpness of the image is as well still in that location.
 The Benefits of Using PNG Files
What Facebook won't tell you, is that you can upload a PNG file at any size you lot wish and achieve a similar effect. Don't forget to catechumen it to sRGB besides, just you aren't restricted on your dimensions this manner.
To do this, simply save your photograph equally a PNG file using your editing software. You can also use the "Salve for Web" function in Photoshop for this by selecting PNG-24 from the drop downwardly list.
If you want to export PNG files straight from Lightroom, nosotros have written a tutorial that shows you how to enable that office.
Some photographers argue that PNG produces even better results than JPEG. So, attempt information technology out! Facebook doesn't mention this, strangely enough, but it is another great way to get your images looking expert online.
Further Reading: "How to Use Facebook to Promote Your Photography"
Information technology's Never Going to Be Perfect
One affair that you lot need to go along in mind is that viewers haven't seen your original, high-resolution file. You, on the other mitt, take.
This ways that you areof grade going to be comparison how your image looks to how the very large, full resolution original looks on your computer. Consequently, things appear to be worse than they actually are (virtually of the time).
Ensure that you are giving yourself some tolerance for the fact that you're uploading a compressed image in the first identify. Call up well-nigh how you await at other photographers' images online – they are almost probable feeling just like yous about online compression.
In reality, though, you view their images thinking they await great. They may contend otherwise, just on social media websites it's all about how the viewer perceives the epitome in the get-go place.
Summary
So as you lot can encounter, images don't have to wait horribly compressed as before long as you upload them to Facebook. Just follow the steps above, and you'll be wishing you knew this before!
Here is a summary of what I've covered, in 4 quick and easy steps.
- Resize your epitome to 2048px on its longest border.
- Use the "Save for Spider web" function, and select seventy% JPEG quality.
- Make sure the file is converted to the sRGB colour profile.
- Upload it to Facebook, and brand sure yous tick "high quality" if you are given the option (usually only for uploading albums).
Or, try using PNG files, as mentioned above!
Remember, if y'all're uploading images online you may want to protect them. We've written instructions forhow to notice websites that are using your photoswithout permission – make sure to read this! It can throw up some very interesting results.
Don't forget to download our free PDF: The Photographer'south Guide to Facebook.
Source: https://www.naturettl.com/upload-photos-facebook-best-quality-possible/
0 Response to "How Do I Change My Pictures on Facebook to Upload in Low Resolution Mode"
Post a Comment